All posts by Scott

Testing for Nitrate in Aquaponics

Your plants need Nitrogen to grow. Nitrogen comes in many forms – Ammonia, Nitrite, and Nitrate. We need to know how much Nitrogen is in our Aquaponics system. We could perform a persulfate digestion to get TN (Total Nitrogen), but in a properly running Aquaponics system, the majority of Nitrogen will be in the form of Nitrate.

When setting up a new system, or making major changes (such as a grow bed cleaning, adding new fish, or changing feed rates) I recommend testing Ammonia and Nitrite as well as Nitrate.

The Nitrogen Cycle

In the nitrogen cycle, bacteria break down the nitrogenous compounds (fish waste & uneaten food). First, Ammonia is changed into Nitrite. Then, Nitrite is changed into Nitrate. Both Ammonia and Nitrite are dangerous to fish, but Nitrate is fairly well tolerated by most species.

Testing for Nitrate in Aquaponics

  1. API Nitrate Test (0, 5, 10, 20, 40, 80, 160 ppm)  $8.92 / 90 = $0.10 per test.
  2. LaMotte Smart3 + 3689-SC. Zinc Reduction. (0.0-60.0 ppm) $33/50 tests = $0.66 per test.
  3. Hach DR900 + 8039 Nitraver 5 Cadmium Reduction. (0.3 – 30pppm)  $50.39 / 100 tests = $0.54 per test
  4. YSI 9500 + NitraTest. (0.0 – 20.0 ppm) $155/200 = $0.77 per test OR $60/50 = $1.20 per test

Iron Chelate Interference: The downside of Fe-EDDHA and FE-HBED

This is part of a series on Aquaponic Water Testing


In an Aquaponic system, we have to rely on some sort of chelate to keep iron available to our plants. Without a chelator, iron is only stable at pH levels below 4. Fe-EDTA is the most common form of chelated iron found, but EDTA is only stable under acidic conditions and it’s breakdown products are phytotoxic.

Suitable chelator choices include Fe-DTPA, Fe-EDDHA, and FE-HBED. Fe-DTPA is a great iron chelate product, but it exhibits rapid photodegredation. One study reported a half life of 30 minutes in full sunlight. When I used Fe-DTPA, I found my iron levels would drop from 2.5ppm to 0.0ppm within 3 days. Since iron chelates are expensive, having to re-dose iron on a regular basis can end up being a large cost. If you are able to keep your water dark, Fe-DTPA may work for you.

The alternatives are Fe-EDDHA, and Fe-HBED. Fe-EDDHA is stable up to a pH of 10, and Fe-HBED is stable up to a pH of 12! Both of these products will stain your water slightly red.

IMG_0130.JPG
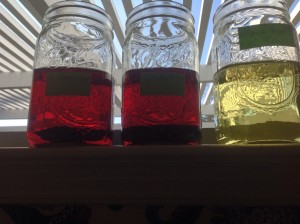
Above:No, that’s not red wine, or kool-aid. It’s iron chelate! From left to right Fe-HBED, Fe-EDDHA, Fe-DTPA. All at 20ppm.
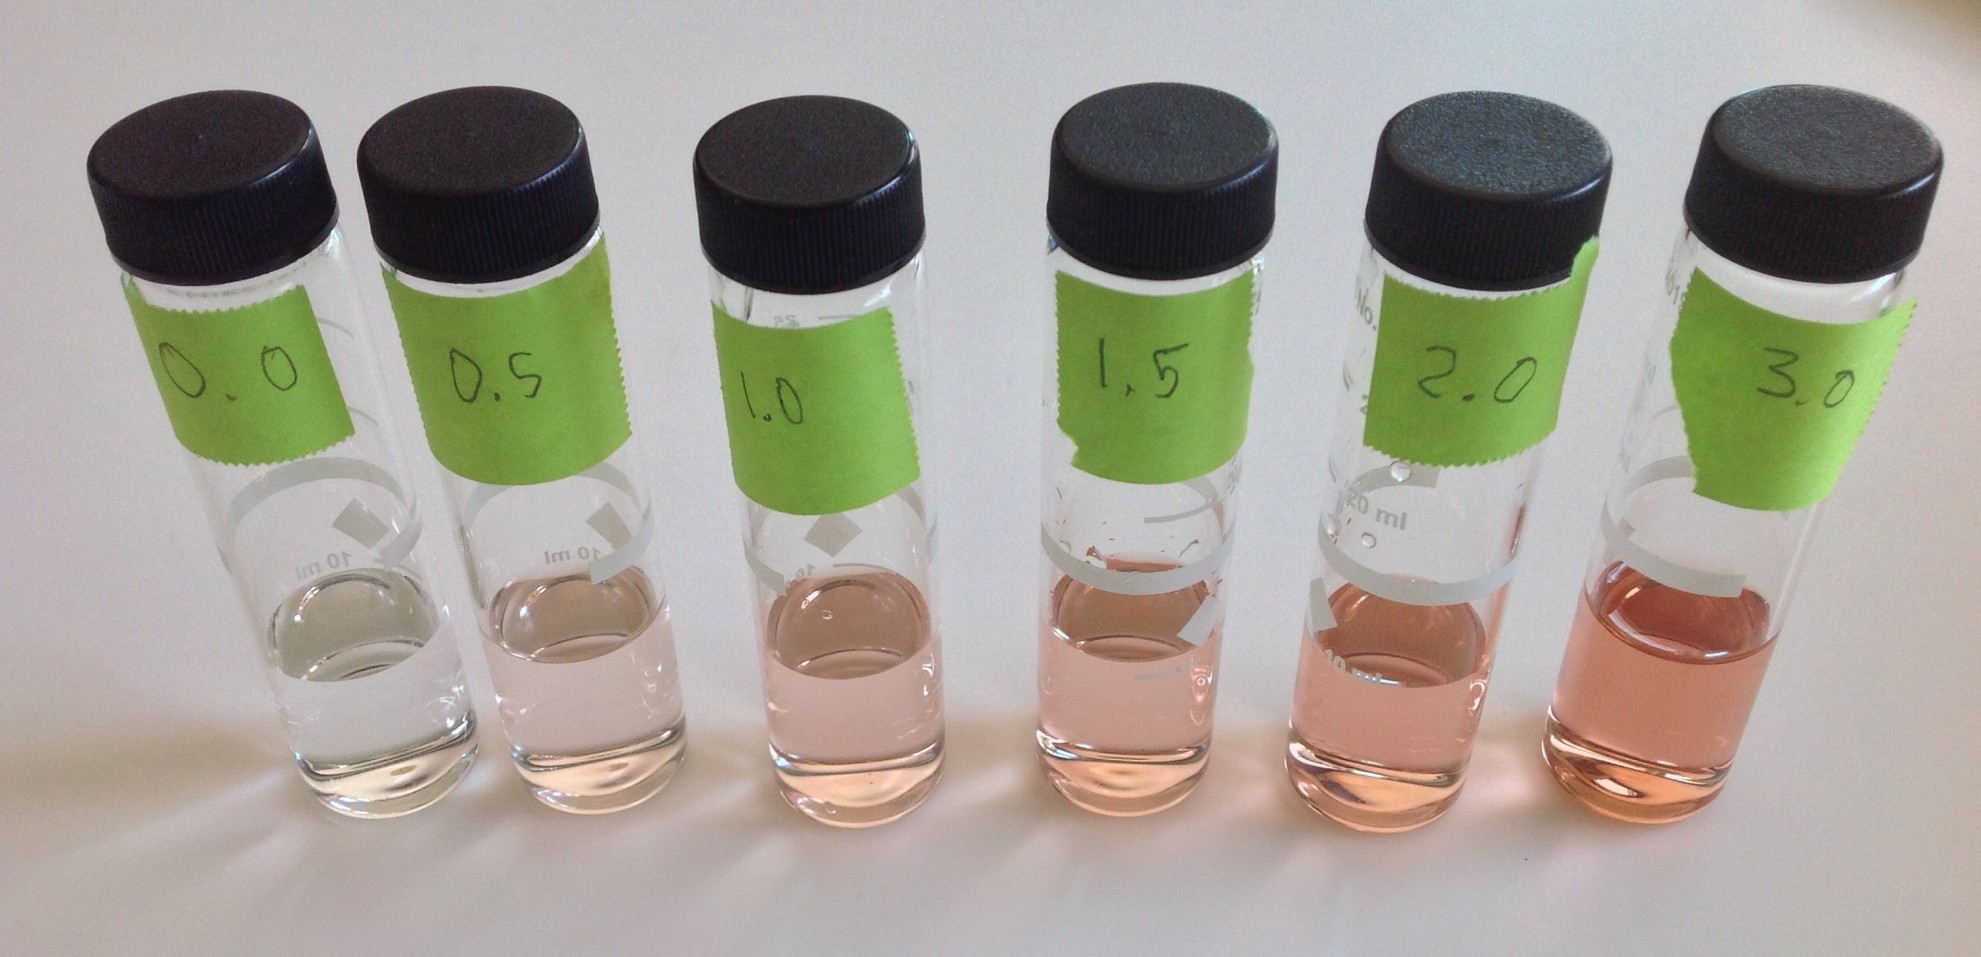
Below: what Fe-EDDHA looks like at 0.5, 1.0, 1.5, 2.0, and 3.0ppm concentrations

IMG_0139.JPG

If this color was “permanent”, colorimeters/spectrophotometers would just compensate for it when you zero out the meter. Unfortunately, certain circumstances cause the pink hue to disappear mid-reaction. The can be caused by the pH going high, and the Fe-EDDHA being degraded, or by the iron being reduced or complexed with another molecule. So far, the problem has been noted with:

  • Nessler based Ammonia Tests
  • Molybdenum blue based Silica and Phosphate tests
  • Iron tests

Interference with Iron Tests:

Most iron tests are phenanthroline  based. An Iron reducing agent is introduced, and then the iron reacts with  phenanthroline to cause a red hue which the photometer reads. Most tests have the reducing agent and phenanthroline combined into one packet. If you were to use a YSI Mid-Range Iron test, you would notice it had two reagents. The first reagent is the iron reducer. After adding the iron reducer, the pink color disappears from the sample. If we zero the meter at this point, then continue the test, we end up with the correct result.

If the meter is zeroed before the iron reducer is added, the pink hue is counted against the further color development. This leads to a reported value that is lower than actual.

There are a few ways to deal with this interference.

  1. Treat your sample blank with Sodium Hydroxide to raise the pH and destroy the Fe-EDDHA. Unfortunately, phenanthroline is only stable up to a pH of 9.0, so you can’t treat the sample.
  2. Treat your sample blank with Sodium Dithionite, an Iron reducing agent. Sodium Metabisulfite is much easier to find and will also work, but will requires 2x as much compared to Sodium Dithionite.
  3. Treat your sample blank with RoVer, an Iron reducing agent.
  4. Use distilled water as your sample blank, accepting that this will cause errors.
  5. Apply a calculated correction to your result.
  6. Stop using Fe-EDDHA/Fe-HBED.

My recommendation is #3 – using RoVer. It’s concentrated, and works like a charm.

Interference with Ammonia Tests

During a Nessler based Ammonia test, the pink hue of Fe-EDDHA disappears after the photometer has been zeroed. This leads to “Inverted Cuvette” errors or bad results.

Interference with Molybdenum blue based Silica and Phosphate Tests

During a Molybdenum blue based Silica or Phosphate test, the pink hue of Fe-EDDHA disappears after the photometer has been zeroed. In testing, the Hach 8048 TestNTube was not susceptible  to interference.

With Fe-EDDHA, it is possible to increase the pH and destroy the EDDHA molecule. 10 drops of Sodium Hydroxide (1N solution, which can be found in the API Calcium Test, bottle 1) will raise the pH enough.

Fe-EDDHA and Fe-HBED Spectral Analysis

Screenshot 2014-08-27 11.36.47


Measure Aquaponic Calcium with Taylor Test Reagents

This is adapted from the Taylor Test website, to better suit the needs of Aquaponics enthusiasts.

You can get the reagents you will need online, or from a local pool supply store. In the USA, Leslie Pools will have the reagents, but you can find better prices if you figure out where all the pool guys buy their supplies. On 12/14/2014, Leslie Pools online showed the price as $28.97 + tax + shipping for the reagents. I recall purchasing them a pool supply company for $16ish.

The reagents we need are all in dropper bottles.  Taylor Test uses a letter after the reagent to indicate the bottle size. A = 3/4 oz. C=2oz. E=16oz.  Because of the differing usage levels, I recommend buying the R-0011L in the A size. It matches up well with the other reagents in C size.

The Reagent Shopping List

  • R-0010-C Calcium Buffer. Good for 70 tests.
  • R-0011L-A Calcium Indicator Liquid. Good for 100 tests
  • R-0012-C Hardness Reagent. Good for 50-150 tests, depending on your calcium level.

The regular procedure has a resolution of 4ppm. The Alternate procedure has a resolution of 10ppm, but half as much reagent and uses an API test tube (which you already have) instead of a 25ml container (which you might need to buy).

One thing that can make the whole process easier is the Taylor Technologies 9265 Magnetic Mixer. It stirs the sample for you during the titration, uses LED lights to help you see the process, and includes a 25ml sample container + the necessary batteries. Not a must-have, but definitely a neat gadget that makes the process easier.

Procedure:

  1. Rinse and fill container with 25mL of water to be tested
  2. Add 20 drops of R-0010 Calcium Buffer. Swirl to mix
  3. Add 5 drops R-0011L Calcium Indicator Liquid. Swirl to mix. Sample will turn red if Calcium is present.
  4. Add R-0012 Hardness Reagent dropwise, swirling and counting from each drop, until color changes from red to blue. Always hold bottle vertically to ensure proper drop size.
  5. Multiply drop of R-0012 Hardness Reagent by 4. Record as parts per million (ppm) Calcium as Ca2+. You can also multiply by 10 for Calcium Hardness as Calcium Carbonate.

Alternate Procedure:

  1. Rinse and fill API test tube to the line (10mL) with water to be tested.
  2. Add 10 drops of R-0010 Calcium Buffer. Swirl to mix.
  3. Add 3 drops R-0011L Calcium Indicator Liquid. Swirl to mix. Sample will turn red if Calcium is present.
  4. Add R-0012 Hardness Reagent dropwise, swirling and counting from each drop, until color changes from red to blue. Always hold bottle vertically to ensure proper drop size.
  5. Multiply drop of R-0012 Hardness Reagent by 10. Record as parts per million (ppm) Calcium as Ca2+. You can also multiply by 25 for Calcium Hardness as Calcium Carbonate.

Dissolved Oxygen

In Aquaponics, Dissolved Oxygen (DO) is extremely important. We all know that fish require dissolved oxygen in order to breathe. But plant roots require adequate dissolved oxygen to survive as well. Even the beneficial bacteria in our filters need oxygen. Having a way of testing for dissolved oxygen lets you make sure you have enough aeration for your fish and plants to thrive. It will also let you answer questions like “How much oxygen do airstones put in my system?” or “Does my system need more aeration?”

Overview of Dissolved Oxygen Testing Options

Dissolved Oxygen testing can be done with a chemical test, electrochemical sensor, or through an optical based sensor.

Chemical testing methods are accurate, and don’t need calibration. The up-front cost can be low, but at $0.51 – $1.20 per test the cost will  add up. The main disadvantage of the chemical methods is you only learn the DO for where you sampled. Comparing DO levels in a tank, sump, and raft bed would need at least 3 separate tests.

With a sensor based meter, you can simple move the DO probe from area to area and wait for the readings to stabilize.

Electrochemical sensors come in two varieties: Galvanic and Polarographic. Polarographic sensors last longer, but require a 5-15 minute warmup. Galvanic sensors work immediately, but won’t last as long as a Polarographic model, as they age even when the meter is  turned off. Luckily both sensor types can be maintained. In continuous use, probe membranes last 2-8 weeks. Plan on spending up to $100 a year in maintenance costs.

Optical Dissolved Oxygen, or Luminescent Dissolved Oxygen probes have the advantage of requiring very little maintenance. The sensor caps should be replaced every year (approx $100), but there are no membranes, special fluids, calibrations, or storage constraints to worry about.

My Opinion

I use a Hach HQ30d meter with Rugged LDO probe. If you are careful, you can buy a similar setup on eBay for around $200. Assume that the sensor cap will be past the calibration expiration date. A new sensor cap is $108, but the sensor will continue to work with an expired cap and you can check the accuracy by performing a calibration. Make sure the eBay vendor states that the probe connects to the meter, and displays a reading.  (PS: Need help figuring out if an eBay auction for a Dissolved Oxygen meter is any good? Ask in the comments. I’ll try to reply individually by email, and won’t post the comment until the auction ends, so nobody snipes it from you.)

If you’re not comfortable with used equipment and are on a budget, the Milwaukee MW600 is a great deal (149@Amazon).

The only real duds here are the chemical tests.

Chemical test / Winkler Titration

  1. Hanna HI3810 (0.0-10.0; Resolution 0.1)
    $56 / 110 = $0.51ea
    HI3810_400
  2. LaMotte 5860-01 (0.0 – 10.0; Resolution 0.2)
    $52 / 50 = $1.04 ea
    Lamotte_5860-01
  3. Hach Digital Titrator +8332 (1 – 10 mg/l)
    $159@Hach + $84@Hach
    Hach Digital TItrator + Hach8215

Chemical Test / Photometric

  1. LaMotte Smart3 + 3688-SC (0.0-10.0; MDL 0.6)
    $40 / 100 = $0.40 ea
  2. Hach DR900 + 8166 (0.3 – 15.0)
    $30 / 25 = $1.20 ea
    This is the easiest chemical dissolved oxygen testing method. Individual vacuum filled ampules have the reagent in them – just snap the neck under-water to fill the ampule, and put it into the meter to read.
    HachDR900 + Hach8166

Electrochemical

  1. OxyGuard Handy Polaris Galvanic $934
    The original handheld, waterproof Dissolved Oxygen Meter. The OxyGuard meters are reported to need less maintenance than other electrochemical probes.
    handypolaris
  2. YSI Pro20 Polarographic or Galvanic $947@Amazon
    MO-YSI-Pro20-DO
  3. YSI 550A Polarographic $759@Amazon
    YSI_550a
  4. YSI EcoSense 200A Polarographic $495@Amazon
    ysi_do200a_cable
  5. American Marine Pinpoint II Polarographic $229@DrFostersSmith
    The Pinpoint II and Milwaukee MW600 are roughly equivalent devices. They both require a two-point calibration (more expensive units don’t need zero calibration) and while the probes are waterproof, the meters are not. If you’re the type to knock something into the tank… neither of these units will survive that.
    Don’t forget to purchase zero-calibration solution as neither meter comes with it.
    pinpointii_Oxygen-Monitor
  6. Milwaukee MW600 Polarographic $149@Amazon
    Update: Milwaukee now ships these units with calibration instructions that don’t require zero-calibration solution! I’d recommend this unit over the Pinpoint II because of that. There is a great video showing how to calibrate and install membranes on this unit here.
    Milwaukee_Dissolved_Oxygen_Meter_MW-600-500x500

Optical

  1. Hach HQ30d + Rugged LDO Sensor
    Meter: $750@Hach +
    Probe: $750@Hach +
    Sensor Cap: $108/yr@Hach
    Hach_HQ30d + Hach_LDO + Hach_LDO_Cap
  2. YSI ProODO
    Meter: $604@Fondriest +
    Probe: $556@Fondriest +
    Sensor Cap: $87/yr@Fondriest
    ysi_proodo + YSI-ProODO-Cable + YSI-ODO-Membrane-Kit

Know of, or use another method of testing for dissolved oxygen in Aquaponics? Let me know in the comments and I’ll update this post.


Estimating water usage for a Market Garden

As part of the planning for starting a Market Garden, I have to estimate my water usage. EBMUD needs this information for capacity planning for their Recycled Water system. They asked me for my heaviest month usage.

A report from the California Irrigation Management Information System lists the following average monthly ETo for Pleasanton, the closest measuring station to me. July, with an average ETo of 7.36 inches is the most demanding month.

Stn Id Stn Name CIMIS Region Jan
(in)
Feb
(in)
Mar
(in)
Apr
(in)
May
(in)
Jun
(in)
Jul
(in)
Aug
(in)
Sep
(in)
Oct
(in)
Nov
(in)
Dec
(in)
Total
(in)
191 Pleasanton SFB
1.50
2.08
3.59
4.85
6.17
6.86
7.36
6.49
4.86
3.32
1.90
1.39
50.37

This data is listed in ETo, which is the EvapoTranspiration for grass. I’m more interested in ETr, which is Evapotranspiration for alfalfa. ETr more closely matches most of the crops I will be growing.

ETr = ETo * 0.83

7.36 * 0.83 = 6.1″ / july acre * 27,154g/in/acre = 165,639 gallons per acre in July.

I plan to start cultivation on 1/2 acre of land. Row density should be 50%.

165,639 gallons / July Acre * 1/2 acre * 50% density = 41,409 Gallons for July, or about 1400 gallons per day.

I believe there should be an additional reduction in usage due to drip-only irrigation, but don’t know how to quantify that at this time.

BTW: At this time, EBMUD charges $3.17 per 100 cubic feet of non-potable water. 100 cubic feet = 748 gallons. I should expect a $175 water bill in July.

References: http://www.agf.gov.bc.ca/resmgmt/publist/500Series/577100-5.pdf

Calculation for full farm usage

Lower Rows: 100 rows @300 ft2/row = 30,000 ft2

Upper Rows: 85 rows @ 210ft2/row = 17,850 ft2

High Tunnels: 4 @ 1,728 ft2 = 7000 ft2

Total growing space (excluding trees): 54,850 ft2 = 1.25 acres.

165,639 g in july/acre * 1.25  = 207,000 gallons for July, or 6,900g/day.

207,000 / 748 = 276 units * $3.17 = $874 water bill in July.

Tree area = 100 trees at 5×12 spacing = 12’x500’=6000 ft2 = 0.13 acres.

Early tree water usage = 80 Gallons Per Week = 4100g/yr
Later tree water usage = 250 Gallons per Week  = 13,000g/yr.

A 5 gpm well provides 7200g/day.